
Nail art is a fun and creative way to express yourself and add some personality to your style. There are many different nail art designs that beginners can try out to get started. From simple polka dots to intricate Floral Nails, there are plenty of options to choose from. Some popular nail art designs for beginners include French tips, ombré nails, heart nails, striped nails, and floral nail art. With some practice and patience, anyone can master these designs and create their own unique nail art creations. Whether you’re looking to add some flair to your everyday look or create a statement for a special occasion, there’s a nail art design out there for everyone.
Simple Nail Art Designs
- Striped Nails
- Polka Dot Nails
- Glitter Nails
- Floral Nails
- Ombré Nails
- French Tip Nails
- Heart Nails
1. Nail Art Designs For Beginners: Striped Nail Art Designs
Creating striped nail art is a fun and versatile way to add a pop of design to your manicure. Here’s a step-by-step tutorial on how to achieve striped nails:

Gather your supplies
- Nail polish colors of your choice (at least two colors that contrast well)
- Base coat
- Top coat
- Nail striping tape or thin striping brush
- Nail polish remover
- Cotton swabs
Step By Step Tutorial for Striped Nail Art
Make sure your nails are clean and dry before you start painting.
Step 1: Apply the base coat
Apply a layer of base coat to protect your nails and help the nail polish adhere better.
Step 2: Apply the base color
Apply a solid color as the base for your nails. This will be the color that shows between the stripes. Apply two coats for full opacity and allow them to dry completely. Make sure the polish is even and smooth.
Step 3: Create the stripes
There are two methods you can use to create the stripes:
- Method 1: Nail Striping Tape
If you have nail striping tape, cut small pieces of tape and place them diagonally or horizontally across your nails. Ensure the tape is firmly pressed down and aligned evenly to create straight lines for the stripes. - Method 2: Thin Striping Brush
If you don’t have striping tape, you can use a thin striping brush. Dip the brush into the nail polish color you want for the stripes and carefully paint thin, straight lines across your nails. You can vary the thickness and direction of the stripes for a unique look.
Step 4: Apply additional stripes
Repeat Step 4 using different colors to create additional stripes. You can alternate colors, create a gradient effect, or use contrasting shades for a bold look. Allow each color to dry before moving on to the next.
Step 5: Remove the tape (if using)
If you used nail striping tape, gently peel it off while the polish is still wet or tacky. This will help create clean and crisp lines. Be careful not to smudge the polish.
Step 6: Touch up and clean up
Use a nail polish remover and a small brush or a cotton swab to clean up any mistakes or excess polish around your nails and cuticles. This step helps to refine the striped design and make it look more polished.
Step 7: Apply top coat
Once the stripes are dry, apply a layer of top coat to seal and protect your nail art. The top coat will also give your nails a glossy finish and help your design last longer.
Step 8: Allow nails to dry
Allow your nails to dry completely before using your hands. This will prevent smudging and ensure that your striped nail art stays intact.
Related Article: 7 Steps To Do Perfect Manicure At Home
2. Simple Nail Art Design: Black Polish Polka Dot Nail Art Designs
Polka dot nails are a classic and simple design that’s perfect for beginners. Here is a step-by-step guide on how to create polka dot nails:

Gather your supplies
To create polka dot nails, you will need:
- Base coat
- Dotting tool or toothpick
- Nail polish colors of your choice
- Topcoat
Step By Step Tutorial for Polka Dot Nail Art
Make sure your nails are clean and dry before you start painting.
Step 1: Apply the base coat
Apply a clear base coat to your nails and let it dry completely. This will protect your nails and help the polish stick.
Step 2: Choose your colors
Choose two or three nail polish colors that you want to use for your polka dots. It’s best to choose colors that complement each other well.
Step 3: Dip the dotting tool into the polish
Using the dotting tool or toothpick, dip the tip into one of your nail polish colors. Make sure the tip is covered in polish but not dripping.
Step 4: Create the dots
Gently touch the dotting tool or toothpick to your nail to create a dot. You can create as many dots as you want, depending on how dense you want the pattern to be. Repeat this step with the other colors you’ve chosen.
Step 5: Let the polish dry
Once you’ve created your polka dot pattern, allow it to dry completely before moving on to the next step. This will prevent the dots from smudging.
Step 6: Apply the top coat
Once the dots are dry, apply a clear top coat to your nails. This will help to protect the polish and give your manicure a shiny finish.
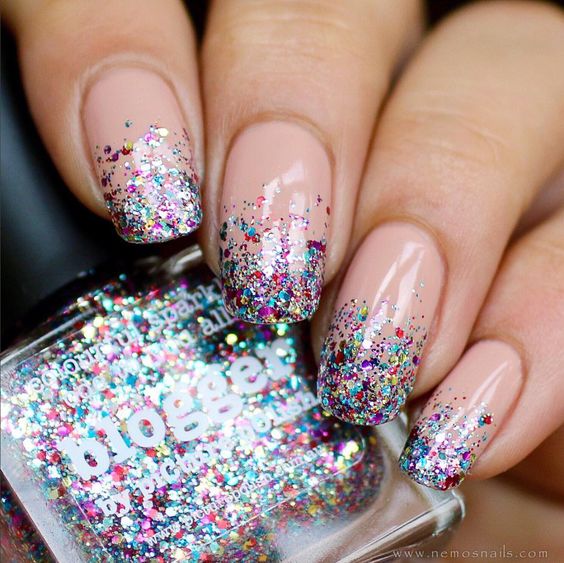
3. Simple Nail Art Tutorial For Beginners: Glitter Nail Art Design
Glitter nails are a fun and easy way to add some sparkle to your manicure. Here is a step-by-step guide on how to create glitter nails:
Gather your supplies
To create glitter nails, you will need:
- Base coat
- Glitter nail polish
- Loose glitter (optional)
- Topcoat
Step By Step Tutorial for Glitter Nail Art Design
Make sure your nails are clean and dry before you start painting.
Step 1: Apply the base coat
Apply a clear base coat to your nails and let it dry completely. This will protect your nails and help the polish stick.
Step 2: Apply the glitter nail polish
Apply a coat of glitter nail polish to your nails. You can apply one or more coats depending on how glittery you want your nails to be.
Step 3: Add loose glitter (optional)
If you want to add even more sparkle to your nails, you can sprinkle loose glitter onto your wet nail polish. Use a small brush to gently press the glitter into the polish.
Step 4: Let the polish dry
Once you’ve applied the glitter polish (and loose glitter, if using), allow it to dry completely before moving on to the next step. This will prevent the glitter from smudging.
Step 5: Apply the top coat
Once the polish is dry, apply a clear top coat to your nails. This will help to protect the polish and give your manicure a shiny finish.
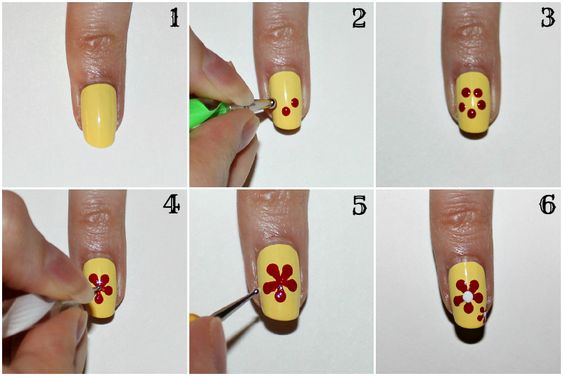
4. Easy Nail Art Design For Beginners: Floral Nail Art Design
Floral nails are a beautiful and feminine design that’s perfect for spring and summer. Here is a step-by-step guide on how to create floral nails:
Gather your supplies
To create floral nails, you will need:
- Base coat
- Nail polish colors of your choice
- Small brush or dotting tool
- Topcoat
Step By Step Tutorial for Floral Nail Art Design
Make sure your nails are clean and dry before you start painting.
Step 1: Apply the base coat
Apply a clear base coat to your nails and let it dry completely. This will protect your nails and help the polish stick.
Step 2: Choose your colors
Choose two or three nail polish colors that you want to use for your flowers. It’s best to choose colors that complement each other well.
Step 3: Create the flower petals
Using a small brush or dotting tool, paint flower petals onto your nails using one of your chosen colors. You can create as many petals as you want, depending on how large you want your flowers to be. Repeat this step with the other colors you’ve chosen.
Step 4: Add the flower centers
Once you’ve created your flower petals, use a contrasting color to add the centers of the flowers. You can use a small dotting tool or toothpick to create the centers.
Step 5: Create leaves and stems (optional)
If you want to create a more realistic floral design, you can use a small brush to paint leaves and stems onto your nails.
Step 6: Let the polish dry
Once you’ve finished painting your floral design, allow it to dry completely before moving on to the next step. This will prevent the polish from smudging.
Step 7: Apply the top coat
Once the polish is dry, apply a clear top coat to your nails. This will help to protect the polish and give your manicure a shiny finish.
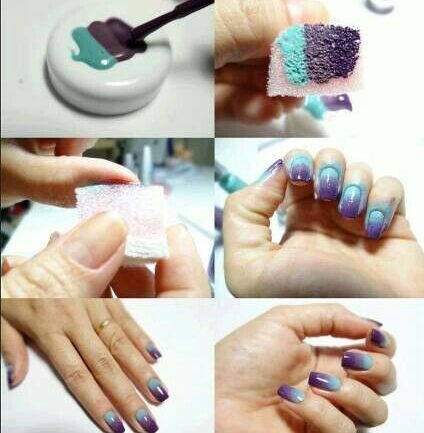
5. Simple Nail Art Design For Beginners: Ombré Nails Art
Ombré nails are a trendy and eye-catching design that’s perfect for any occasion. Here is a step-by-step guide on how to create ombré nails:
Gather your supplies
- Base coat
- Two different nail polish colors (preferably in the same color family)
- Makeup sponge
- Topcoat
- Cotton swabs
- Nail polish remover
Step By Step Tutorial for Ombré Nails Art
Start by removing any old nail polish and shape your nails. Make sure your nails are clean and dry before you start painting.
Step 1: Apply the base coat
Apply a clear base coat to your nails and let it dry completely. This will protect your nails and help the polish stick.
Step 2: Choose your colors
It’s best to choose shades that are in the same color family or blend well together. For example, you could choose different shades of blue or pink for a cohesive gradient.
Step 3: Prepare the sponge
Take a makeup sponge and cut it into a small, rectangular shape that is slightly larger than your nail. The sponge will be used to create the ombre effect. It’s important to use a clean, unused sponge for best results.
Step 4: Paint the makeup sponge
Paint one half of the makeup sponge with one of your chosen nail polish colors and the other half with the other color. Make sure the colors slightly overlap to create a smooth transition.
Step 5: Apply the polish
Dab the sponge onto your nails repeatedly, blending the two colors together to create an ombré effect. You may need to reapply the polish to the sponge a few times to get the desired effect.
Step 6: Let the polish dry
Once you’ve applied the polish, allow it to dry completely before moving on to the next step. This will prevent the polish from smudging.
Step 7: Clean up the edges
Use a small brush or cotton swab dipped in nail polish remover to clean up any polish that has gotten onto your skin or cuticles.
Step 8: Apply the top coat
Once the polish is dry and cleaned up, apply a clear top coat to your nails. This will help to protect the polish and give your manicure a shiny finish.
6. Nail Art Design: French Tip Nails Art Designs
Creating a classic French tip manicure is a timeless and elegant choice. Here’s a step-by-step tutorial on how to achieve French tip nails:

Gather your supplies
- Nail polish colors: a sheer/nude color for the base and a white or off-white color for the tips
- Base coat
- Top coat
- Nail file
- Cuticle pusher
- Nail polish remover
- Nail guides or adhesive tape (optional)
- Small brush (optional)
Read also: Bollywood Celebrities and Their Favourite Hairstyles
Step By Step Tutorial for French Tip Nails Art Designs
Step 1: Prepare your nails
Start by removing any old nail polish using a cotton swab soaked in nail polish remover. Shape your nails with a file and gently push back your cuticles using a cuticle pusher. Apply a layer of base coat to protect your nails and help the nail polish adhere better.
Step 2: Apply the base color
Apply a sheer or nude-colored nail polish to all of your nails as the base color. Apply two coats for full opacity and allow them to dry completely. Make sure the polish is even and smooth.
Step 3: Create the French tip
There are a couple of methods to create the French tip:
Method 1: Nail Guides
If you have nail guides, apply them to your nails, leaving only the tips exposed. Nail guides are small stickers that help create a straight line for the French tip. Make sure they are positioned securely and evenly on each nail.
Method 2: Adhesive Tape
If you don’t have nail guides, you can use adhesive tape to create a straight line for the French tip. Cut small strips of tape and place them diagonally across your nails, covering the area you want to be the tip. Ensure the tape is firmly pressed down to prevent polish from seeping underneath.
Step 4: Apply the tip color
Using a white or off-white nail polish, carefully apply the color to the exposed tips of your nails. Start from one side and gently stroke across to the other side, following the shape of the nail. If needed, you can use a small brush for more precision. Apply two coats if necessary, allowing each coat to dry before adding the next.
Step 5: Remove the nail guides or tape
If you used nail guides or adhesive tape, gently peel them off while the white tip polish is still wet. This will help create clean and crisp lines. Be careful not to smudge the polish.
Step 6: Touch up and clean up
Use a small brush or a cotton swab dipped in nail polish remover to clean up any mistakes or excess polish around your nails and cuticles. This step helps to refine the French tip and make it look more polished.
Step 7: Apply top coat
Once your French tips are dry, apply a layer of top coat to seal and protect your manicure. The top coat will also give your nails a glossy finish and help your French tip last longer.
Step 8: Allow nails to dry
Allow your nails to dry completely before using your hands. This will prevent smudging and ensure that your French tip manicure stays intact.
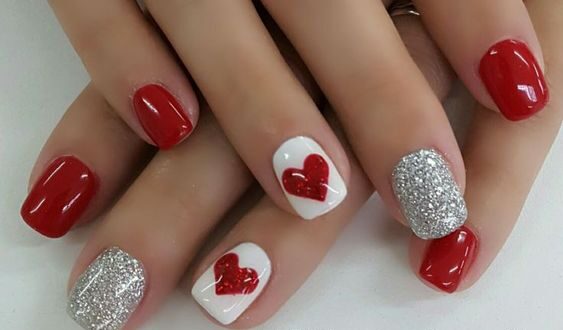
7. Step by Step Nail Art Design: Heart Nail Art Designs
Heart nails are a fun and romantic design that’s perfect for Valentine’s Day or any day you want to spread some love. Here is a step-by-step guide on how to create heart nails:
Gather your supplies
To create heart nails, you will need:
- Base coat
- Red nail polish
- White nail polish (Nail polish colors of your choice)
- Toothpick or small brush
- Topcoat
Step By Step Tutorial for Heart Nail Art Designs
Make sure your nails are clean and dry before you start painting.
Step 1: Apply the base coat
Apply a clear base coat to your nails and let it dry completely. This will protect your nails and help the polish stick.
Step 2: Paint your nails red or other color
Apply two coats of red nail polish to your nails and let them dry completely.
Step 3: Create the hearts
Using a toothpick or small brush, paint two dots next to each other in white on your nails. Start by drawing a small “V” shape at the center of your nail, then add rounded curves on each side to form the top of the heart. Fill in the shape and adjust it as needed. Repeat this step on all nails. Repeat this step to create as many hearts as you want.
Step 4: Let the polish dry
Once you’ve created the hearts, allow the polish to dry completely before moving on to the next step. This will prevent the polish from smudging.
Step 5: Apply the top coat
Once the polish is dry, apply a clear top coat to your nails. This will help to protect the polish and give your manicure a shiny finish.
Conclusion:Nail art doesn’t have to be complicated or intimidating, especially for beginners. With these simple and easy designs, you can create beautiful nail art at home with just a few tools and some patience. The key is to start small and experiment with different colors and techniques to find what works best for you. Once you’ve mastered these beginner-friendly designs, you can move on to more complex and intricate designs. Have fun and let your creativity shine!
Related Articles: