
Be it any casual event or a wedding, braid hairstyles are the attraction of youngsters. The braids are always considered traditional but braid hairstyles have become quite popular over the time. Indian long hair Braid styles are the first choice of Indian women who don’t want to keep their hair open. Braids helps to keep your hair manageable in place for long time and also avoid tangles. Traditional braids are now placed to designer and stylist look braids as we can see models on ramp with different Braid Hairstyles.
You have a lot of options in braid such as French braid, standard braid, fishtail braid, fluffy braid etc. Braids are perfect on Indian as well as western outfit and give a rich and stylish look. In this article, you can get best Indian braided hairstyles, which are quite popular among girls.
1. French Braid
The French braid has become one of the most loved of Indian braid hairstyles. French braid is complex to construct than a simple braid hairstyle.

How to French braid: step by step
Step 1 : Take some hair at the middle of top and divide it into three equal sections.
Step 2 : Take the left section, crossing over the middle one, join with the right section.
Step 3 : In the same way, take right section, crossing over the middle join with the left section.
Step 4 : With every step, add more hair from the right and left side, cross it over the middle. Go with this pattern till all hair is not added.
Once you reach the neck, bring your hair to one side of neck and finish off with three braids.
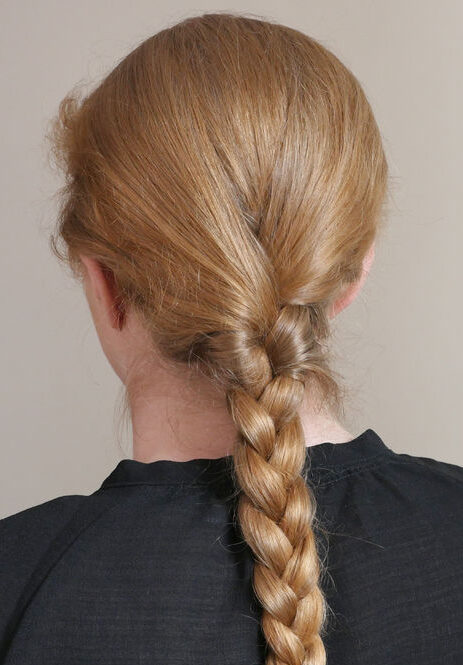
2. Standard Braid
This is the most common and easy to wear hair style, followed by majority of females. Until you’ve not tried this and always braided a portion of your hair, try this one and give a different look to your hair.
How to Standard braid: step by step
Step 1 : Gently brush and gather all your hair back, now divide all hair into three equal sections with your fingers.
Step 2 : Take the left section over the middle one.
Step 3 : Take right section, crossing over the middle section.
Step 4 : Take the left section over the middle one and right section over the middle one.
Step 5 : Repeat this procedure till the length of your hair. If your hair is long, bring your hair to one side of shoulder and finish it.
3. Fishtail Braid
Fishtail braids are never out of fashion. It looks very stylish even on western wear. Indian women, college going girls and bollywood celebrities enhance their beauty to wear also bob hairstyle. One sided fishtail braid is also very popular that give a unique look to your regular hairstyle.

How to Fishtail braid: step by step
Step 1 : Comb and gather all your hair back and hold it together at the nape of your neck.
Step 2 : Divide your ponytail into two equal-sized ponytails.
Step 3 : Using your fingers, separate a thin strand of hair from the outside of the left ponytail and cross it over to the right ponytail.
Step 4 : Now in the same manner, separate a thin strand of hair from the outside of the right ponytail and cross it over to the left ponytail.
Step 5 : Repeat the above steps till you reach the ends. Once you’re finished braiding till the end, secure it with an elastic band. Gently pull your braid with your fingers to give it an elegant look.
4. Fluffy Braid
Are you going to ready for a party but little confused about your hairstyle? Fluffy Braid can be a best solution of your problem. After a little practice, you can be able to braid your hair with attractive designs. This can be one of the best braid hairstyles for medium hair that you can try. So, ready with some rubber bands-

How to Fluffy Braid: step by step
Step 1 : Gather all your hair back and Comb. Then, take the front section of your hair, create a normal ponytail but only with the upper section and secure it with an elastic.
Step 2 : Take another section from the sides and secure with another elastic. Now, you will have two ponytails directly under each other.
Step 3 : Take the top ponytail and divide into two sections. Combine sections with clear elastic. Pull the 2nd ponytail up in between the division. Clip it on the head and again join the first sections with an elastic just below the gap.
Step 4 : Now, repeat the above step with 2nd ponytail. Divide it into two sections and repeat the above step.
Continue until you reach the end and secure the end with an rubber band. At last, pull out the strands to create the fluffy effect of the hairstyle.
Also Read: How To Do a Perfect Donut Bun
5. Dutch Braid
The Dutch braid, also known as the “reverse French braid,” creates a striking, raised braid that stands out against the scalp.

How to Dutch Braid: Step by Step
Step 1: Brush your hair and start with a small section at the top of your head.
Step 2: Divide the section into three equal parts.
Step 3: Begin braiding by crossing the right strand under the middle, then the left strand under the new middle strand.
Step 4: As you continue braiding, add hair from each side into the braid, crossing strands under rather than over.
Step 5: Once you’ve reached the nape of your neck, continue with a regular three-strand braid until the end of your hair. Secure with a hair tie.
6. Waterfall Braid
The waterfall braid is a romantic hairstyle that cascades beautifully down the side of your head, creating a stunning visual effect.

How to Waterfall Braid: Step by Step
Step 1: Start by brushing your hair and parting it on one side.
Step 2: Take a small section of hair near your parting and divide it into three equal strands.
Step 3: Begin a French braid by crossing the top strand over the middle and then the bottom strand over the new middle strand.
Step 4: As you continue braiding, drop the bottom strand and let it hang loose. Pick up a new section of hair adjacent to the dropped strand and incorporate it into your braid as the new bottom strand.
Step 5: Continue this process until you reach the back of your head. Secure the braid with a hairpin or small elastic.
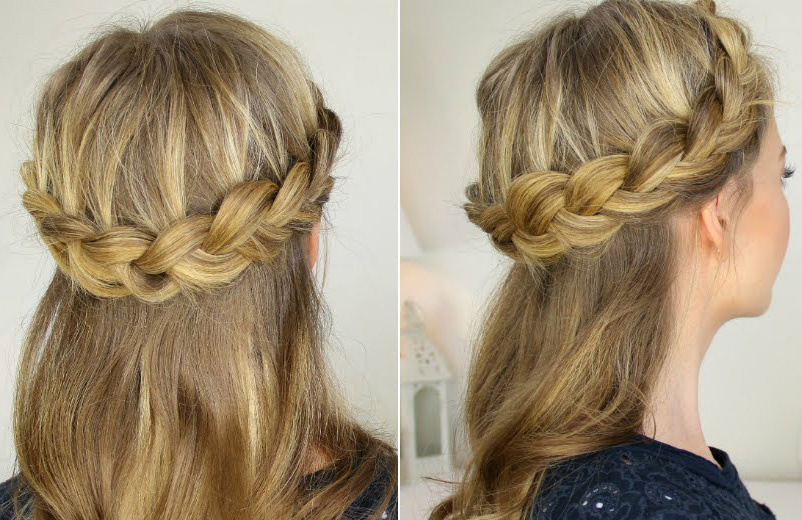
7. Crown Braid
The crown braid is an elegant and regal hairstyle that encircles your head, making you look like royalty.
How to Crown Braid: Step by Step
Step 1: Brush your hair and part it down the middle.
Step 2: Starting near your left ear, take a small section of hair and divide it into three strands.
Step 3: Begin a Dutch braid by crossing the right strand under the middle and then the left strand under the new middle strand.
Step 4: As you continue braiding, incorporate additional hair from both sides into the braid, keeping the braid close to your hairline.
Step 5: Continue braiding around your head until you reach your starting point. Tuck the end of the braid underneath the beginning of the braid and secure with hairpins.
8. Rope Braid
The rope braid is a simple yet stylish alternative to the traditional three-strand braid, creating a twisted effect that adds visual interest to your hairstyle.

How to Rope Braid: Step by Step
Step 1: Brush your hair and gather it into a ponytail at your desired height.
Step 2: Divide your ponytail into two equal sections.
Step 3: Twist each section in the same direction (e.g., clockwise) until you reach the end of your hair.
Step 4: Cross the two twisted sections over each other in the opposite direction (e.g., counterclockwise) to create the rope-like effect.
Step 5: Secure the end with a hair tie.
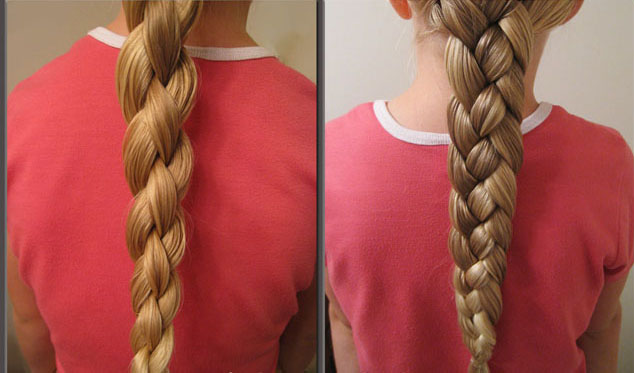
9. Four-Strand Braid
The four-strand braid adds an extra level of intricacy to your hairstyle, making it a great choice for special occasions or when you want to try something new.
How to Four-Strand Braid: Step by Step
Step 1: Brush your hair and divide it into four equal strands.
Step 2: Cross the leftmost strand over the strand to its right.
Step 3: Cross the rightmost strand over the strand to its left.
Step 4: Cross the second strand from the left over the strand to its right.
Step 5: Repeat steps 2-4 until you reach the end of your hair and secure with a hair tie.
10. Pull-Through Braid
The pull-through braid creates a faux braided look, perfect for those with shorter hair or who struggle with traditional braiding techniques.

How to Pull-Through Braid: Step by Step
Step 1: Brush your hair and gather it into a high ponytail. Secure with a hair tie.
Step 2: Take a small section of hair from the top of your ponytail and secure it with another hair tie about an inch below the first one.
Step 3: Create a small opening between the two hair ties and pull the rest of your ponytail through the opening.
Step 4: Continue this process, securing small sections with hair ties and pulling the ponytail through the opening until you reach the end of your hair.
Step 5: Gently tug on the sides of each “braid” to create a fuller, more voluminous look.
11. Milkmaid Braid
The milkmaid braid is a classic updo that gives off a charming, vintage vibe, perfect for special events or casual outings.

How to Milkmaid Braid: Step by Step
Step 1: Brush your hair and part it down the middle.
Step 2: Create two regular three-strand braids on each side of your head, starting at the nape of your neck. Secure each braid with a hair tie.
Step 3: Gently pull on the sides of each braid to create a fuller appearance.
Step 4: Bring one braid up and over the top of your head, positioning it like a headband. Secure it in place with hairpins.
Step 5: Repeat with the other braid, tucking the end underneath the first braid and securing with hairpins.
12. Ladder Braid
The ladder braid is an intricate hairstyle that features a unique, woven effect reminiscent of a ladder.

How to Ladder Braid: Step by Step
Step 1: Brush your hair and start with a small section near your parting.
Step 2: Divide the section into three equal strands and begin a French braid by crossing the right strand over the middle and then the left strand over the new middle strand.
Step 3: As you continue braiding, only add hair to the bottom strand, leaving the top strand free.
Step 4: Once you’ve reached the desired length, secure the braid with a hair tie.
Step 5: Create a second, smaller three-strand braid parallel to the first one, leaving a small gap between them.
Step 6: Weave the second braid through the gaps in the first braid, creating the “ladder” effect. Secure both braids with a hair tie.
Suggested for You: 20 Little-Known Tips for Shiny, Voluminous Hair
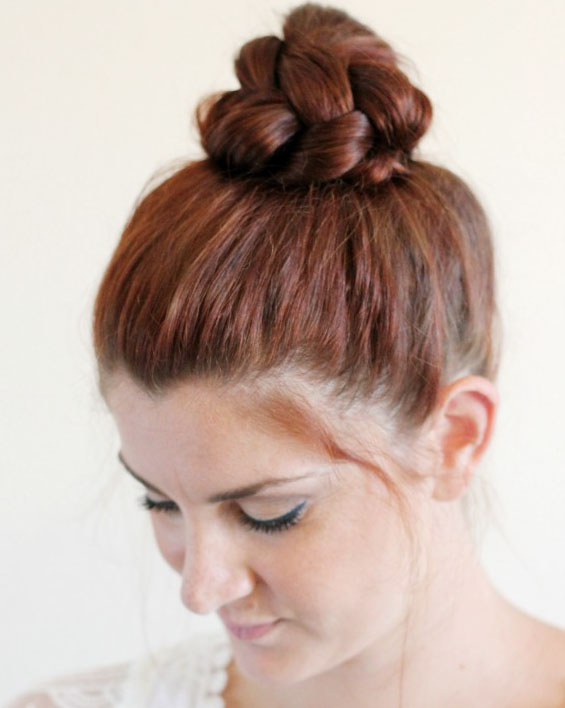
13. Braided Top Knot
The braided top knot is a chic and modern hairstyle that combines the elegance of a braid with the edginess of a top knot, making it perfect for both casual and formal events.
How to Braided Top Knot: Step by Step
Step 1: Brush your hair and gather it into a high ponytail. Secure with a hair tie.
Step 2: Divide your ponytail into three equal strands.
Step 3: Create a regular three-strand braid, braiding until you reach the end of your hair. Secure with a hair tie.
Step 4: Gently pull on the sides of the braid to create a fuller appearance.
Step 5: Wrap the braid around the base of your ponytail, creating a top knot. Secure in place with hairpins.
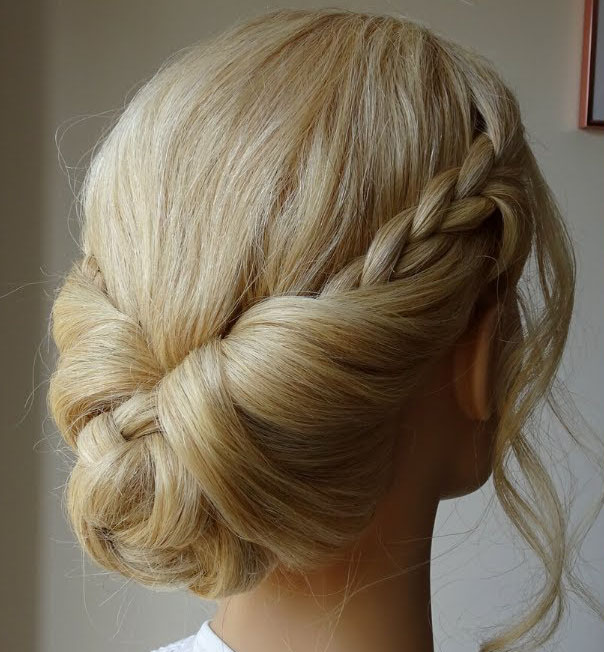
14. Braided Chignon
The braided chignon is an elegant and sophisticated hairstyle that’s perfect for special occasions, such as weddings or formal events.
How to Braided Chignon: Step by Step
Step 1: Brush your hair and create a low side part.
Step 2: Starting near your ear on the side with more hair, take a small section and divide it into three strands.
Step 3: Create a Dutch braid by crossing the right strand under the middle and then the left strand under the new middle strand.
Step 4: As you continue braiding, incorporate additional hair from both sides into the braid, keeping the braid close to your hairline and moving towards the opposite ear.
Step 5: Once you’ve reached the opposite side of your head, continue braiding without adding any more hair until you reach the end. Secure with a hair tie.
Step 6: Gather the remaining loose hair and the end of the braid into a low side ponytail. Twist the ponytail into a bun and secure with hairpins.
15. Braided Mohawk
The braided Mohawk is a bold and edgy hairstyle that combines the punk-inspired Mohawk with the intricate beauty of braids, making it perfect for those who want to make a statement with their hair.

How to Braided Mohawk: Step by Step
Step 1: Brush your hair and create a vertical part from the front of your head to the nape of your neck on both sides, leaving a wide strip of hair in the center.
Step 2: Temporarily clip or tie the side sections out of the way.
Step 3: Starting at the front of the center section of hair, divide it into three strands and begin a Dutch braid by crossing the right strand under the middle and then the left strand under the new middle strand.
Step 4: As you continue braiding, incorporate additional hair from the center section into the braid.
Step 5: Once you’ve reached the nape of your neck, secure the braid with a hair tie.
Step 6: Optionally, you can tease the side sections of hair to add volume and create an even more dramatic Mohawk effect.
16. Braided Ponytail
The braided ponytail is a stylish and sporty hairstyle that adds a touch of flair to the classic ponytail.
How to Braided Ponytail: Step by Step
Step 1: Brush your hair and gather it into a high ponytail. Secure with a hair tie.
Step 2: Take a small section of hair from the underside of your ponytail and divide it into three strands.
Step 3: Create a regular three-strand braid, braiding until you reach the end of your hair. Secure with a hair tie.
Step 4: Wrap the braid around the base of your ponytail, covering the hair tie. Secure in place with hairpins.
17. Side-Swept Fishtail Braid
The side-swept fishtail braid is a romantic and feminine hairstyle that’s perfect for date nights, weddings, or any occasion where you want to look effortlessly beautiful.

How to Side-Swept Fishtail Braid: Step by Step
Step 1: Brush your hair and create a deep side part.
Step 2: Gather your hair to one side of your head, right below your ear.
Step 3: Divide your hair into two equal sections.
Step 4: Create a fishtail braid by taking a small piece of hair from the outer edge of the right section and crossing it over to the left section. Repeat this process with a small piece from the outer edge of the left section, crossing it over to the right section.
Step 5: Continue alternating between the right and left sections until you reach the end of your hair. Secure with a hair tie.
18. Braided Updo
The braided updo is a versatile and elegant hairstyle that can be tailored to suit any occasion, from casual outings to formal events.

How to Braided Updo: Step by Step
Step 1: Brush your hair and create a low side part.
Step 2: Starting near your ear on the side with more hair, take a small section and divide it into three strands.
Step 3: Create a Dutch braid by crossing the right strand under the middle and then the left strand under the new middle strand.
Step 4: As you continue braiding, incorporate additional hair from both sides into the braid, moving towards the opposite ear.
Step 5: Once you’ve reached the opposite side of your head, continue braiding without adding any more hair until you reach the end. Secure with a hair tie.
Step 6: Gather the remaining loose hair and the end of the braid into a low ponytail. Twist the ponytail into a bun and secure with hairpins.
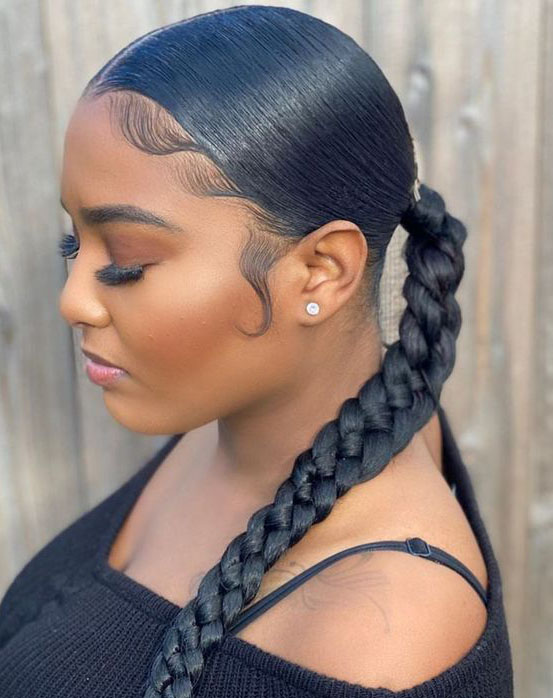
19. Double French Braids
Double French braids are a playful and sporty hairstyle that keeps your hair neatly in place while adding a touch of style to your look.

How to Double French Braids: Step by Step
Step 1: Brush your hair and create a center part from the front of your head to the nape of your neck.
Step 2: Starting on one side of your head, take a small section near your hairline and divide it into three equal strands.
Step 3: Begin a French braid by crossing the right strand over the middle and then the left strand over the new middle strand.
Step 4: As you continue braiding, incorporate additional hair from both sides into the braid, keeping even tension throughout.
Step 5: Once you’ve reached the nape of your neck, continue with a regular three-strand braid until you reach the end of your hair. Secure with a hair tie.
Step 6: Repeat the process on the other side of your head to create a second French braid.
20. Side Braid with Curls
The side braid with curls is a glamorous and feminine hairstyle that combines the elegance of a braid with the softness of flowing curls.

How to Side Braid with Curls: Step by Step
Step 1: Curl your hair using a curling iron or wand to create loose waves.
Step 2: Create a deep side part and gather your hair to one side of your head.
Step 3: Divide your hair into three equal strands and create a loose, regular three-strand braid.
Step 4: Secure the braid with a hair tie and gently pull on the sides of the braid to create a fuller, more voluminous appearance.
Step 5: Use a hairspray or styling product to hold the curls and braid in place.
Suggested links: